Wednesday, September 21, 2022

3D printing has proved to be extremely useful. (Part-3)

 In the previous part, we discussed the different types of mechanical accessories. Today, we'll learn more about the types of electronic accessories and, finally, we'll look at some DIY 3D printers.

Types of Mechanical accessories:

- Radial Ball Bearing 623ZZ for 3D Printer

- Fan 5015 12V 0.15A Sleeve Bearing Brushless Fan

Radial Ball Bearing 623ZZ for 3D Printer


The Radial Ball Bearing 623ZZ for 3D Printer/ Robot is a Double Shielded Ball Bearing with 623ZZ ABEC-3 quality. 623ZZ Bearings are a popular item that can be used in many applications that require this size. Each 623ZZ bearing is closed with two metal shields on each side to protect the bearing from dust or other possible contamination.

Bearings are available in a variety of qualities. It is required for the majority of RepRap 3D printers. Our bearings are pre-lubricated by the manufacturer, so no additional lubrication is required. These shields the bearing from dust and potential corrosion.

Sleeve Bearing Brushless Fan

The Sleeve Bearing Brushless Mini Blower fan is simple to operate. It only requires a 12V DC power source. The blower fan increases air velocity. They are primarily used for exhausting, cooling, ventilating, and other similar purposes. It is resistant to high temperatures and extremely long-lasting. Ideal for cooling heat sinks on hot ends, prints, and other cooling requirements. Other applications include forced cooling of PCBs and PCB components, active cooling of hot end extruders, and SBCs such as the Raspberry Pi, Beaglebone Black, and others.

Electronic Accessories:


Electronic Accessories are one of the main parts of the 3D Printer. Here are some of the electronic parts and their functions: -

- 3D Printer Parts Spring for Heated bed MK3 CR-10 Hotbed

- 3D Printer 12864 Graphic Smart Display

3D Printer Parts Spring for Heated bed MK3 CR-10 Hotbed


The 3D Printer Spring is for an MK3 3D printer's heat bed. This spring provides good stiffness to the 3D printer bed and prevents the printer bed from shifting during the print. This is critical when printing a 3D print with a longer print time because the print will be ruined if the bed shifts during the print.

These springs are strong helical compression springs made of rectangular wire that is commonly used with die sets. Rectangular wire reduces the solid height and increases the design's space efficiency.

3D Printer 12864 Graphic Smart Display

The Printer 12864 Graphic Smart Display is a display for a 3d printer. Using the "smart adapter," you can easily connect it to your Ramps board. After connecting this panel to your Ramps, you won't need your computer anymore because the Smart Controller will power your SD card. Furthermore, all actions such as calibration and axis movement can be performed using the Smart Controller's rotary encoder. Print 3D designs without a PC by using a g-code design stored on an SD card.

DIY 3D Printer:


DIY 3D printer kits are excellent in terms of quality and low cost, and they produce high-quality prints. However, assembly requires time and patience. It may also necessitate a certain level of expertise. Here are some examples of DIY 3D Printers:

- Creality Ender-3 Pro 3D Printer DIY Kit

- Creality Ender 3 V2 3D Printer


3D printing has proved to be extremely useful. (Part-2)

In the previous part, we discussed what a 3D printer is, what it can be used for, and what 3D printer accessories are available. Today we will learn more about various types of mechanical accessories.

Types of Mechanical accessories:

  • LM10UU 10mm Linear Motion Bearing for 3D Printer
  • Aluminium Profile Angle Bracket L Joint Corner 2020
  • Openbuilds M5 Flat T Nut for 20mm Aluminium Profile
  • Radial Ball Bearing 626ZZ for 3D Printer

LM10UU 10mm Linear Motion Bearing for 3D Printer


This Linear Motion Bearing is made up of an outer cylinder, a ball retainer, balls, and two end rings. End rings keep the ball retainer, which holds the balls in the recirculating trucks, inside the outer cylinder. These components are assembled to optimize their required functions. The LM10UU 10mm Linear Motion Bearings are ideal for linear motion in 3D printers, CNC machines, and other applications. It provides a linear motion system that is precise, safe, and dependable.

This Linear Motion Bearing closed type ball bushing has a 10mm bore and a 19mm outer diameter and is suitable for carrying components in a mounted slide unit. These Bearings have standardized, interchangeable parts, so you don't have to worry about replacing any worn parts.


Aluminium Profile Angle Bracket L Joint Corner 2020


The Aluminium Profile Angle Bracket L Joint Corner 2020 is for Aluminum Extrusion Profile. Insert the two ends of the l bracket into the groove of the profile to create a right-angle connection between the two aluminum profiles. Corner Bracket in Cast Iron for 20mm Aluminum Extrusion These cast aluminum brackets are used to connect 90-degree angle pieces of 20mm aluminum extrusion. The gussets ensure a strong, rigid connection.

Openbuilds M5 Flat T Nut for 20mm Aluminium Profile


Tee nuts are an essential part of any open build, adding flexibility and extending tuning. Simple to install to strengthen the system; fast and secure connection along the length of the V-groove or c-beam linear guide. The Openbuilds M5 Flat T Nut has a custom angular angle for easy sliding. M5 or 4mm screws are recommended for installation. Compatible with 10mm size slots. These Tee Nuts are reversible. If you need more threading, flip them upside down.

Radial Ball Bearing 626ZZ for 3D Printer


The Radial Ball Bearing 626ZZ is for 3D Printer/ Robot is a Double Shielded Ball Bearing with an ABEC-3 rating of 626ZZ. 626ZZ Bearings are a popular item that can be used in a variety of applications that require this size.

Bearings are available in a variety of qualities. We carefully selected the highest quality bearings from a variety of suppliers. This material is ideal for use in your 3D printer, CNC project, or robot. It is required for the majority of RepRap 3D printers. Our bearings are pre-lubricated by the manufacturer, so no additional lubrication is required.


Stay tuned for the next part....

3D printing has proved to be extremely useful. (Part-1)

 3D printing, also known as additive manufacturing, creates three-dimensional objects from a computer-generated design layer by layer. 3D printing is an additive process that involves layering material to form a 3D part. 3D printers have advanced significantly in recent years, and they can now play critical roles in a wide range of applications, including manufacturing, medicine, architecture, custom art, and design, and they can range from fully functional to purely aesthetic.

3D printers gained popularity quickly after they became commercially available. They proved to be extremely useful for manufacturers looking for a simple way to create parts for the items they produce. The first 3D printer was created 30 years ago, and this wonderful device has taken the world by storm since then. Let us now discuss mechanical and electronic accessories.

Types of Mechanical accessories:

Mechanical accessories are one of the main parts of the 3D Printer. Here are some of the Mechanical parts and their functions: -

  • 2GT 20 teeth pulley wheel
  • LM12UU 12mm Linear Motion Bearing
  • GT2 Rubber Timing Belt Closed Loop

2GT 20 teeth pulley wheel

Timing Idler Pulley Wheel in Aluminum GT2 For 6mm Belt 20 Tooth 5mm Bore pulley; it will work perfectly with GT2 pulley-belt sets we sell in our store. This idler works well with the 20T GT2 driving Timing Belt Pulley. Many DIY 3D printer builders use idler pulleys made from 3D printed wheels. Because the outside diameter of the idler is not concentric to the rotation axis, an inaccurately printed idler reduces printing quality and causes vibrations. Other manufacturers employ double bearings with stationary washers clamped on both sides.

LM12UU 12mm Linear Motion Bearing

The LM12UU 12mm Linear Motion Bearings are ideal for linear motion in 3D printers, CNC machines, and other applications. It provides a linear motion system that is precise, safe, and dependable. These Bearings have standardized, interchangeable parts, so you don't have to worry about replacing any worn parts. The LM12UU Linear Motion Bearing A solid steel outer cylinder is used to manufacture high precision and rigidity linear motion bearings. In addition, the linear motion bearing has an industrial-strength resin retainer.

A linear motion bearing is made up of an outer cylinder, a ball retainer, balls, and two end rings. End rings keep the ball retainer, which holds the balls in the recirculating trucks, inside the outer cylinder.

GT2 Rubber Timing Belt Closed Loop

GT2 Rubber Timing Belt is a closed-loop with a width of 6mm and a length of 200mm that is used to generate linear motion, timing synchronization, torque and speed conversion, and other applications. The GT2 system's Grip is an extension of the HTD system with greater load-carrying capacity. It's a flexible belt with teeth molded into the inside surface.

The GT2 belt series is specifically designed for linear motion. They use a rounded tooth profile with a 2mm pitch to ensure that the belt tooth fits smoothly and accurately in the pulley groove, so there is no room for the belt to move in the groove when the pulley direction is reversed.

Stay tuned for the next part...

Tuesday, September 20, 2022

What is a Bo Motor And Stepper Motor

Bo Motor:

Bo motor (Battery Operated) is a lightweight DC geared motor that produces high torque and rpm at low voltages. A bo motor with varying rated speeds is available here. When powered by a single Li-Ion cell, this motor can reach speeds of around 200 rpm. Excellent for battery-powered lightweight robots. This Bo Motor can be interfaced to a motor wheel and chassis, which is perfect to make a DIY mobile robot car.

Application of Bo motor

The BO Motor is used in Science Projects, Robotics, Arduino programming, Project Design, Internet of Things (IoT), Science Exhibition, do it yourself (DIY), Embedded Systems, Training, Experiments, Robot Making, Atal Tinkering Lab (ATL Lab), Engineering Projects, Diploma Projects, Science Models, Raspberry Pi, and AR-VR applications.

Stepper Motors:

A brushless DC electric motor that divides a full rotation into several equal steps is known as a stepper motor. It is also known as a step motor or stepping motor. If the motor is correctly sized for the application in terms of torque and speed, the motor's position can be commanded to move and hold at one of these steps without the use of a position sensor for feedback. The following are some examples of the stepper motor: -

  • 12V Valve DC Gear Stepper Motor
  •  NEMA17 Stepper Motor
  •  5V DC Stepper Motor

12V Valve DC Gear Stepper Motor:

The 12V DC Stepper Motor is a low-cost, high-quality geared step motor. The Stepper Motor is a widely used combination of stepper motors that provides system stability and reliability.

NEMA17 Stepper Motor

A NEMA 17 stepper motor is a faceplate-mounted stepper motor. The NEMA 17 is larger and heavier than a NEMA 14, but this also means it has more room to put a higher torque. However, its size does not indicate its power. The NEMA17 stepper uses a Dupont connector cable for connecting the motor to its applications.

5V DC Stepper Motor

The 5V DC Stepper Motor is a low-cost, high-quality geared step motor. Because of the system's stability and reliability, the Stepper Motor and ULN2003 Stepper Motor Driver is a widely used combination of stepper motor and stepper driver. With a reduction ratio of 64:1, the motor provides adequate torque for its size at speeds of about 15 RPM. It is a five-wire unipolar stepper motor.

Applications of Stepper Motor-

Floppy disc drives, flatbed scanners, computer printers, plotters, slot machines, image scanners, compact disc drives, intelligent lighting, camera lenses, CNC machines, and 3D printers all use stepper motors.


Friday, September 16, 2022

What is NODE MCU?

NodeMCU is an open-source firmware platform that includes open-source prototyping board designs. The term "NodeMCU" is an abbreviation for the word "node" and "microcontroller" (microcontroller unit). The term "NodeMCU" strictly refers to the firmware rather than the associated development kits. The firmware as well as the prototyping board designs are open source.

The firmware employs the Lua scripting language. A circuit board configured as a dual in-line package (DIP) that integrates a USB controller with a smaller surface-mounted board containing the MCU and antenna is commonly used for prototyping. The DIP format allows for simple prototyping on breadboards. The design was initially based on the ESP8266's ESP-12 module, which is a Wi-Fi SoC integrated and widely used in IoT applications.

The below products shown are some of the examples of the NodeMCU development board

ESP32 Node MCU Development Board with Wi-fi and Bluetooth (CP2102 Driver, 30 PIN)

The ESP WROOM 32 is a powerful, generic WiFi-BT-BLE MCU module designed for a wide range of applications, from low-power sensor networks to the most demanding tasks like voice encoding, music streaming, and MP3 decoding.

The ESP32S chip, which is designed to be scalable and adaptive, is at the heart of the node's MCU module. Two CPU cores can be controlled or powered independently, and the clock frequency can be adjusted from 80 MHz to 240 MHz. The user can also turn off the CPU and use the low-power coprocessor to constantly monitor the peripherals for changes or threshold crossings. The ESP32S includes a wide range of peripherals, including capacitive touch sensors, Hall sensors, low-noise sense amplifiers, an SD card interface, Ethernet, high-speed SDIO/SPI, UART, and I2C.

NodeMCU ESP8266 (AMICA-CP2102 driver)

The Amica Node MCU development board is based on the ESP8266 and includes a CP2102 USB-TTL converter. The Node MCU is an open-source firmware and development platform that allows you to prototype and launch IoT projects. The Amica Node MCU board includes an onboard voltage regulator and 10 GPIO pins to help you power up your development board as quickly as possible.

The board is built around the widely used ESP8266 Wi-Fi Module chip and the ESP-12 SMD footprint. This WiFi development board already includes all the components required to program and upload code to the ESP8266 (ESP-12E). It includes a USB to serial chip upload code, 3.3V regulator, and logic level converter circuit, allowing you to upload codes and connect your circuits right away. This board includes the ESP-12E chip, which has a 4MB! flash memory, so you will not have to worry about long project codes.

Node MCU ESP8266 V3 (LOLIN CH340 chip)

The all-new Node MCU ESP8266 V3 CH340 Wifi Development Board is a cutting-edge low-cost Wi-Fi technology that is fast and easy to use. Modern, mature LUA-based technology of the highest level. It is a fully integrated unit with all available resources. It is extremely simple to add to your existing Arduino projects or any development board with I/O pins.

Modern Internet development tools, such as Node.js, can use Node MCU's built-in API to get your idea up and running quickly. NodeMCU is based on the mature ESP8266 technology and is designed to take advantage of the vast resources available on the internet.

The Node MCU is an open-source firmware and development kit that allows you to quickly prototype your IoT product using a few lines of Lua code. The Development Kit is built around an ESP8266 with integrated GPIO, PWM, IIC, 1-Wire, and ADC.

ESP32 Camera Module

The ESP32-Camera Module is a WIFI+ Bluetooth dual-mode development board with onboard antennas and ESP32 cores. It can function as a stand-alone system. ESP combines Wi-Fi, Bluetooth, and BLE Beacon with two high-performance 32-bit LX6 CPUs, a 7-stage pipeline architecture, an 80MHz to 240MHz main frequency adjustment range, an on-chip sensor, a Hall sensor, a temperature sensor, and other features.

The Wi-Fi 802.11b/g/n/e/i and Bluetooth 4.2 standards are fully supported by the ESP32 camera module, which can be used as a master mode to build an independent network controller or as a slave to another host MCUs to add networking capabilities to existing devices. The ESP32-CAM can be found in a wide range of IoT applications.

It is appropriate for smart home devices, industrial wireless control, wireless monitoring, QR wireless identification, wireless positioning system signals, and Internet of Things (IoT) applications. It is a great choice for IoT applications.


Thursday, September 15, 2022

How to Make a Drone at Home

 Drones are small, self-flying, remote-controlled aircraft. There are many different types of drones you can build and operate, but for beginners, the simplest quadcopter to build and control is a simple quadcopter. A simple drone is a great way to learn how they work and practice piloting them before moving on to more expensive and complex platforms. If you're wondering what drone accessories to buy, here's a comprehensive list of everything you'll need to build your own drone/quadcopter.


Selecting a Quadcopter Frame Design

The most common type of drone is a quadcopter, which has an "X" shape with a propeller on each tip of the frame. There are also tricopter (three propellers), hexacopter (six propellers), and octocopter (eight propellers) frames available. Hexacopters are excellent for redundancy; even if one motor fails, the system remains stable. Because of their size, octocopters are typically reserved for flyers who need to transport a payload. However, if you're looking to save money, a quadcopter is usually the best place to start due to its lower cost.

Purchase a Carbon Fiber Frame

Carbon fiber frames are slightly more expensive than other frame materials, but they are lighter and more durable. If you keep the drone for several years, it will last much longer. Wood is the cheapest frame material, but it warps in the rain. Plastic is a popular and long-lasting material. You can even make your plastic frame if you have a 3D printer. Because of their lightweight, aluminum frames are also used, but they are not as durable. If you have some extra cash, go with carbon fiber. If money is an issue, plastic is the next best option.

Buy a Brushless Motor

Brushless and brushed motors are the two types of drone motors. Brushed motors are made up of a magnet and coils. While the coils spin, the magnets remain in place. Brushed motors have a problem in that the brushes wear out and must be replaced. Brushless motors also have magnets and coils, but the coils remain stationary while the magnets spin. These motors are more durable and last longer because they lack brushes.

For racing drones, choose higher KVs.

KV ratings are assigned to motors. The KV rating indicates how many volts are required to power the motor. Lower KV-rated motors in the 1000-1500 range can be used for a beginner drone. These motors allow you to stabilize and practice with your new drone.

If you have more experience, purchase higher KV-rated motors in the 1500-2300 range. These motors are used for racing, giving your drone more power and torque and allowing you to maneuver around trees and obstacles.

Install Propellers with Smaller Diameters

Propellers are made of a variety of materials and have two or three blades. Carbon fiber is the best material, but plastic and wood propellers are also available.

Smaller diameter propellers make it easier to slow down or accelerate, which is important for a new drone owner. Longer blades are better for long, stable flights.

Batteries must be compatible with the motor's voltage requirements.

One of the most common mistakes made by new drone owners is purchasing batteries that are not compatible with the motor's voltage requirements. KV ratings indicate the number of volts required to power each motor. First, decide on the motor you want to buy, and then match the battery to the voltage requirements.

Take Note of Your Flight Controller's Sensors

You fly your drone using the flight controller. Every controller includes several sensors that provide information about the location and current status of your drone. If you fly the drone too far away, you'll need a sensor to tell you to bring it closer or you'll lose it.

 GPS is the most important sensor. GPS pinpoints the location of your drone. You won't always have a clear view of the drone, and GPS will help you navigate during the flight. The barometer is another important sensor. A barometer is a device that measures atmospheric pressure. This pressure indicates the drone's height. Flying your drone too high may result in a crash.

 The angle of the drone is indicated by the gyroscope. This is useful when you stabilize it during flight and hover over one location. The accelerometer measures the drone's acceleration.

Wednesday, September 14, 2022

All about peltier Module (TEC1-12706)

Many electronic components have a better signal-to-noise ratio at lower temperatures or are damaged when operating at temperatures above specifications. Similarly, certain chemical reactions must be kept at or below a certain temperature. A Peltier module can be used to solve thermal issues and cool objects below the ambient temperature in these applications, whereas a conventional heat sink and fan, cannot. Furthermore, Peltier modules and the appropriate control circuit allow an object to be kept at a constant temperature even when subjected to rapidly fluctuating thermal loads.

Peltier Module Basics

Peltier modules are made up of two external ceramic plates that are separated by semiconductor pellets. When a current is passed through the semiconductor pellets, one of the plates absorbs heat and the other plate dissipates heat (becomes hotter). This technical paper contains more information on the construction and operation of Peltier modules.

Heat Transfer Through Peltier Modules

The amount of heat transferred from the cold side to the hot side by a Peltier module is denoted Q and is specified in Watts. This parameter can be the heat generated by an object to be cooled or the heat conducted from the object to the ambient environment. Peltier modules are incapable of absorbing thermal energy. Peltier modules only transfer thermal energy, and the energy transferred must be dissipated on the module's hot side.

Temperature Difference Across Peltier Modules

The temperature difference specified in a TEC1-12706 Peltier module is measured on the module's two ceramic plates outside surfaces. It is critical to determine whether or not there is a temperature difference between the Peltier module plates and the external system temperatures of interest. 


The temperature of the Hot Side of Peltier Modules

Peltier module characteristics vary with operating temperature. CUI Devices, for example, provides specification data for more than one operating temperature. Because specification data for the application's specific operating temperatures is unlikely to be available, the closest available data should be used.

Surface Area of Peltier Modules

Peltier modules' surface area is typically specified based on the area of the object to be cooled or the area available for heat dissipation. A low thermal impedance heat spreader can compensate for an area mismatch between the available area and the area of the Peltier module. Aluminum or copper can be used to make a simple heat spreader.

Required Operating Current

Peltier modules, like LEDs, are current-driven devices. The most convenient way to achieve the desired operating parameters is to drive the module with a controlled current source and allow the current source to provide the required load voltage. This is equivalent to applying a specific voltage to a voltage-driven device and then allowing the voltage source to provide the necessary current.

Peltier modules can be driven by voltage sources, but this makes accurate control of the heat flow and temperature difference across the module more difficult.

Conclusion

Peltier modules can be an excellent solution when it is necessary to cool an object below its ambient temperature or to keep an object at a specific temperature. To ensure a successful design, choose a vendor who offers a variety of Peltier modules as well as adequate characterization data. In addition to working with a trustworthy vendor, it is critical to understand the nuances of module implementation and operation, such as the fundamentals outlined in this post.

Thursday, September 8, 2022

Soil Moisture Sensor Working and Applications

The moisture content of the soil is critical in the irrigation field as well as in plant gardens. The nutrients in the soil feed the plants, allowing them to grow. It is also necessary to provide water to the plants to change their temperature. Water can be used to change the temperature of the plant through a process like transpiration. Plant root systems develop more effectively when growing in moist soil. Extreme soil moisture levels can lead to anaerobic conditions that promote plant growth as well as the growth of soil pathogens. This article provides an overview of the soil moisture sensor, its operation, and its applications.


What is a Soil Moisture Sensor?

One type of sensor used to measure the volumetric content of water in the soil is the soil moisture sensor. The straight gravimetric dimension of soil moisture requires removal, drying, and sample weighting. These sensors measure the volumetric water content indirectly, using soil rules such as dielectric constant, electrical resistance, otherwise interaction with neutrons, and moisture content replacement.

The relationship between the calculated property and soil moisture should be adjusted and may change depending on environmental factors such as temperature, soil type, and electric conductivity. The reflected microwave emission is influenced by soil moisture and is primarily used in agriculture and remote sensing within hydrology.

Working Principle

This sensor primarily employs capacitance to determine the water content of the soil. This sensor works by inserting it into the earth, and the status of the water content in the soil is reported in the form of a percentage. This sensor is ideal for use in science courses such as environmental science, agricultural science, biology, soil science, botany, and horticulture.

The applications of moisture sensors include the following.

·      Agriculture

·      Landscape irrigation

·      Research

·      Simple sensors for gardeners

It all comes down to the soil moisture sensor. Finally, we can conclude that this sensor is used to measure the volumetric water content of the soil, making it ideal for experiments in the fields of agricultural science, soil science, horticulture, environmental science, biology, and botany.

Wednesday, September 7, 2022

Heart Pulse Rate Monitor using Arduino & Pulse Sensor

The Heart Rate Pulse Sensor is an Arduino-compatible heart-rate sensor. The essence is a noise-reducing circuit sensor and an integrated optical amplifying circuit. The Pulse Sensor is attached to your earlobe or fingertip. Then plug it into your Arduino, and you're ready to read heart rate. The heart logo is printed on the front of the sensor. Here is where you put your finger. On the front, there is a small round hole through which the green LED shines. A small ambient light photosensor APDS9008 is located just below the LED and adjusts the brightness in different lighting conditions.

The MCP6001 Op-Amp IC and a few resistors and capacitors are located on the module's back. The R/C filter network is made up of this. There is also a reverse protection diode to prevent damage if the power leads are connected backward. The module is powered by a 3.3 to 5V DC supply and has an operating current of 4mA.

Pinout -

There are three pins on the pulse sensor:

  • VCC - Connect to a 3.3v ~ 5V Power Supply
  • GND - Connect To GND
  • Analog Pin - Connect To A0

Heart Pulse Rate Monitor using Arduino & Pulse Sensor

Below is the circuit diagram for interfacing the Heart Rate Pulse Sensor with Arduino and LCD.

The connection is simple. Connect the Sensor's VCC pin to the Arduino 5V pin and GND to GND. Connect the sensor's Analog output pin to the Arduino's A0 pin.

Working on the Project:

When the human heart beats, blood is pumped through the body and squeezed into the capillary tissues. As a result, the volume of these capillary tissues expands. However, the volume inside capillary tissues decreases between two consecutive heartbeats. The amount of light that passes through these tissues is affected by the change in volume between heartbeats. A microcontroller can be used to measure this.

A light on the pulse sensor module aids in measuring the pulse rate. When we place our finger on the pulse sensor, the amount of light reflected varies according to the volume of blood inside the capillary blood vessels. This variation in light transmission and reflection can be extracted as a pulse from the pulse sensor's output. This pulse can then be conditioned to measure heartbeats and programmed to read as a heartbeat count using Arduino.

Thursday, September 1, 2022

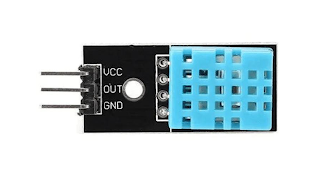
What is the difference between a DHT11 Sensor and a DHT Sensor Module

 The DHT11 is a widely used temperature and humidity sensor with a dedicated NTC for temperature measurement and an 8-bit microcontroller for serial output of temperature and humidity values. 

Pinout Configuration

For DHT11 Sensor

  •       Vcc - Power supply 3.5V to 5.5V
  •        Data - Outputs both Temperature and Humidity through serial Data
  •         NC - No Connection and hence not used
  •        Ground - Connected to the ground of the circuit 

For the DHT11 Sensor module

  •      Vcc - Power supply 3.5V to 5.5V
  •      Data - Outputs both Temperature and Humidity through serial Data
  •      Ground - Connected to the ground of the circuit

Difference between DHT11 Sensor and Module

The DHT11 sensor is available as a sensor or a module. The sensor's performance is the same in either case. The sensor will be a 4-pin package with only three pins used, whereas the DHT11 Sensor module will have three pins.


The sensor and the module differ only in that the module includes a filtering capacitor and a pull-up resistor, whereas the sensor requires you to use them externally if necessary.

Where to use DHT11 Sensors

The DHT11 is a temperature and humidity sensor that is widely used to detect temperature and humidity. The sensor includes a temperature NTC and an 8-bit microcontroller that outputs temperature and humidity values as serial data. The sensor is also factory calibrated, making it simple to connect to other microcontrollers.

The sensor has an accuracy of ±1°C and ±1% and can measure temperature from 0°C to 50°C and humidity from 20% to 90%. So, if you need to measure in this range, this sensor could be a good option for you. 

Applications

·       Measure temperature and humidity

·       Local Weather station

·       Automatic climate control

·       Environment monitoring

Dairy-Free Protein Powders: Enhancing Your Fitness Journey with Pea and Brown Rice Protein

For individuals with lactose intolerance, finding suitable protein powder options can be a challenge. While whey protein isolate is a popula...